Quick Start: Procurement Approval Workflow
This tutorial uses a minimal procurement request to complete the full cycle of defining assets, building a workflow, validating the design, and testing it at runtime. When finished, an applicant can submit a procurement request, a department manager can review it, and high-value purchases continue to finance review.
1. Prerequisites
Before you begin, confirm that:
- The current application has an editable version in DEVELOPING status.
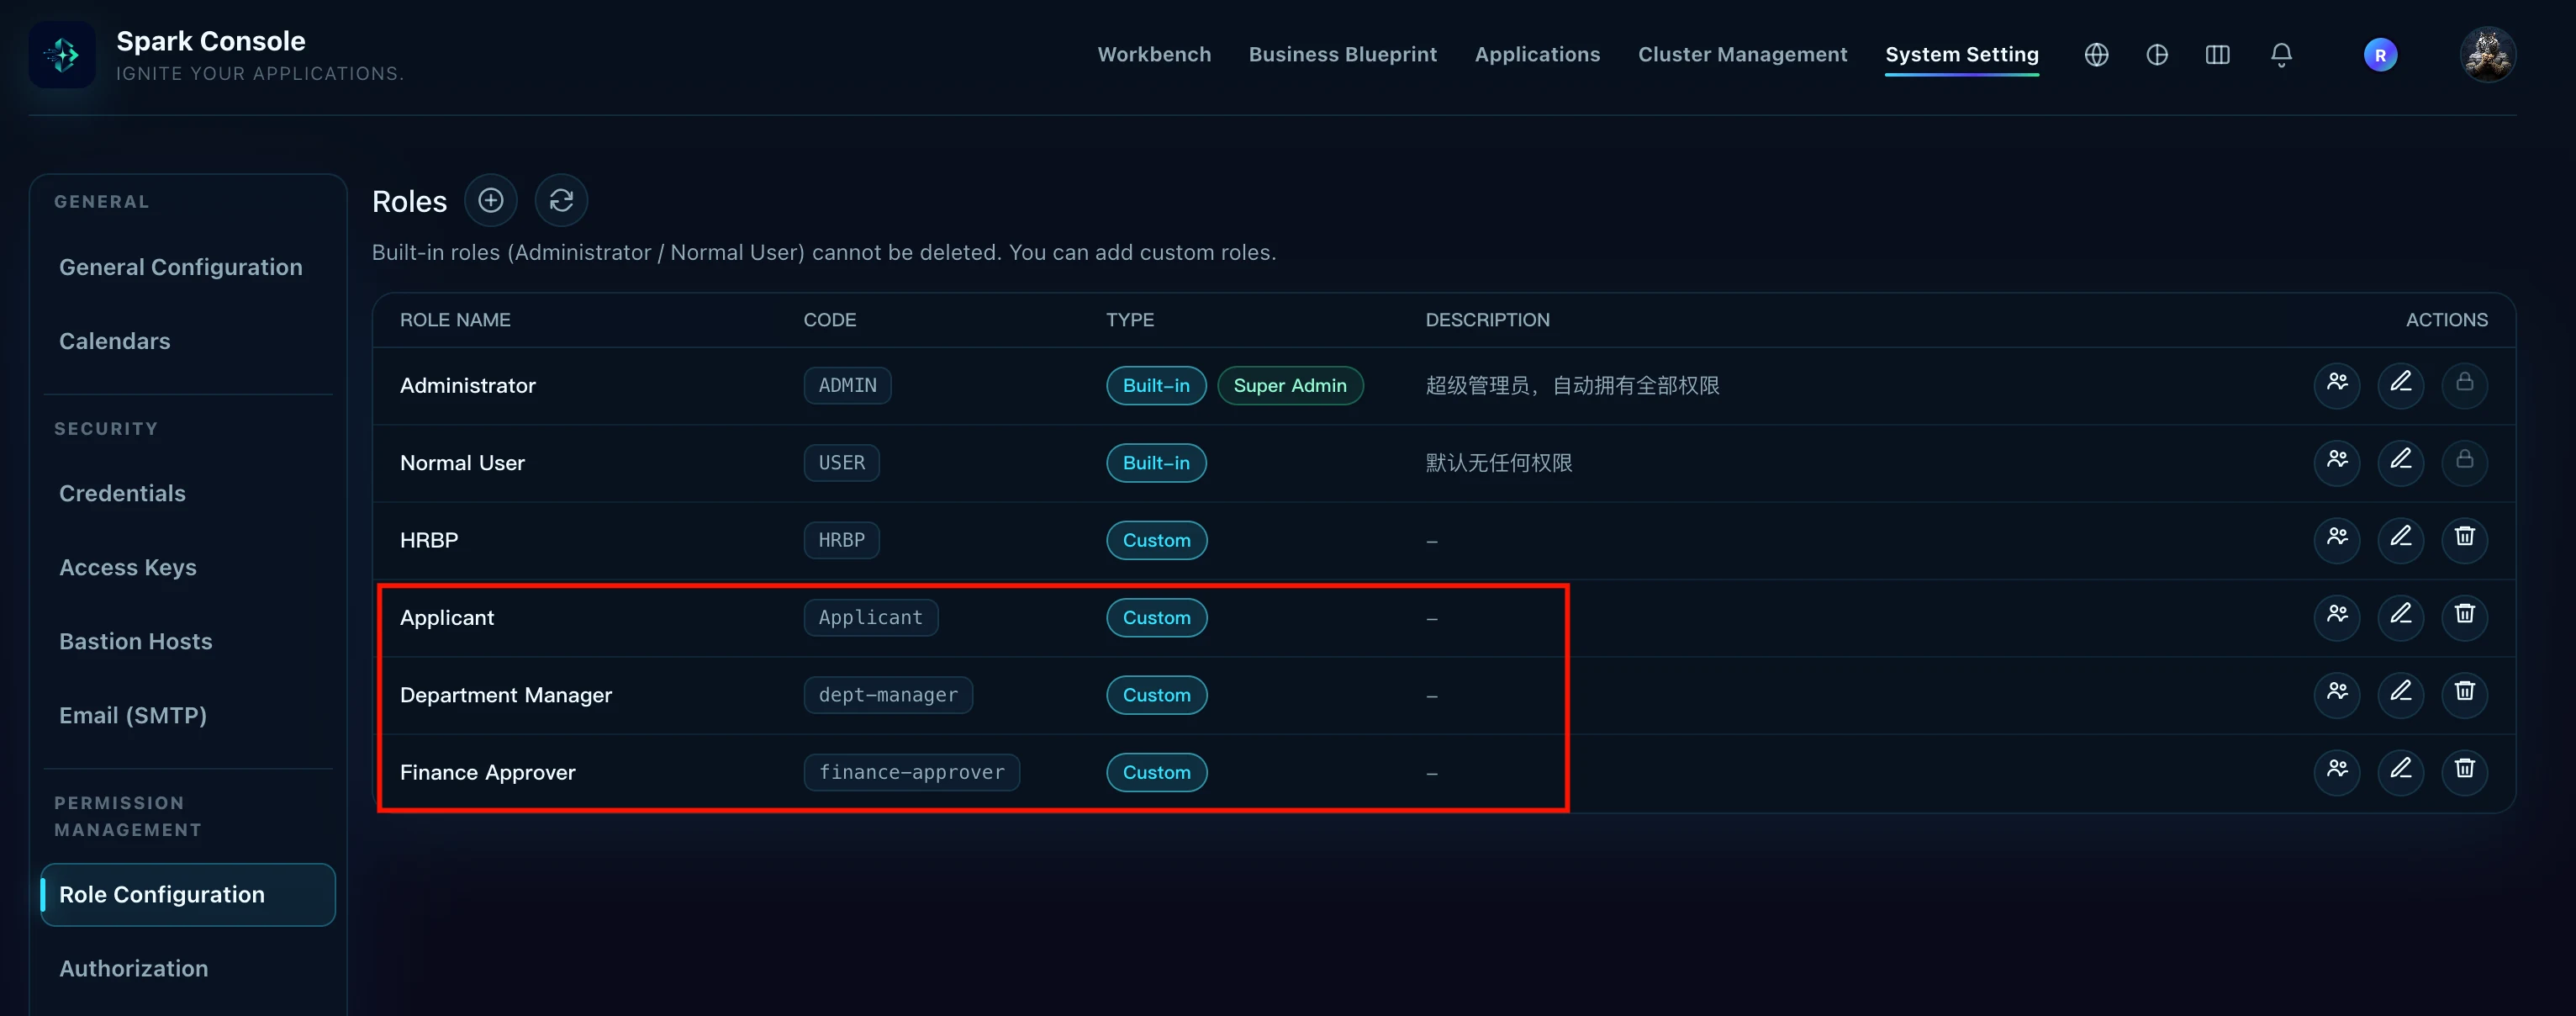
- Test users or roles are available for Applicant, Department Manager, and Finance Approver.
- The applicant's department can resolve its department manager.
- You have permission to edit process assets and publish the application.
2. Create fields
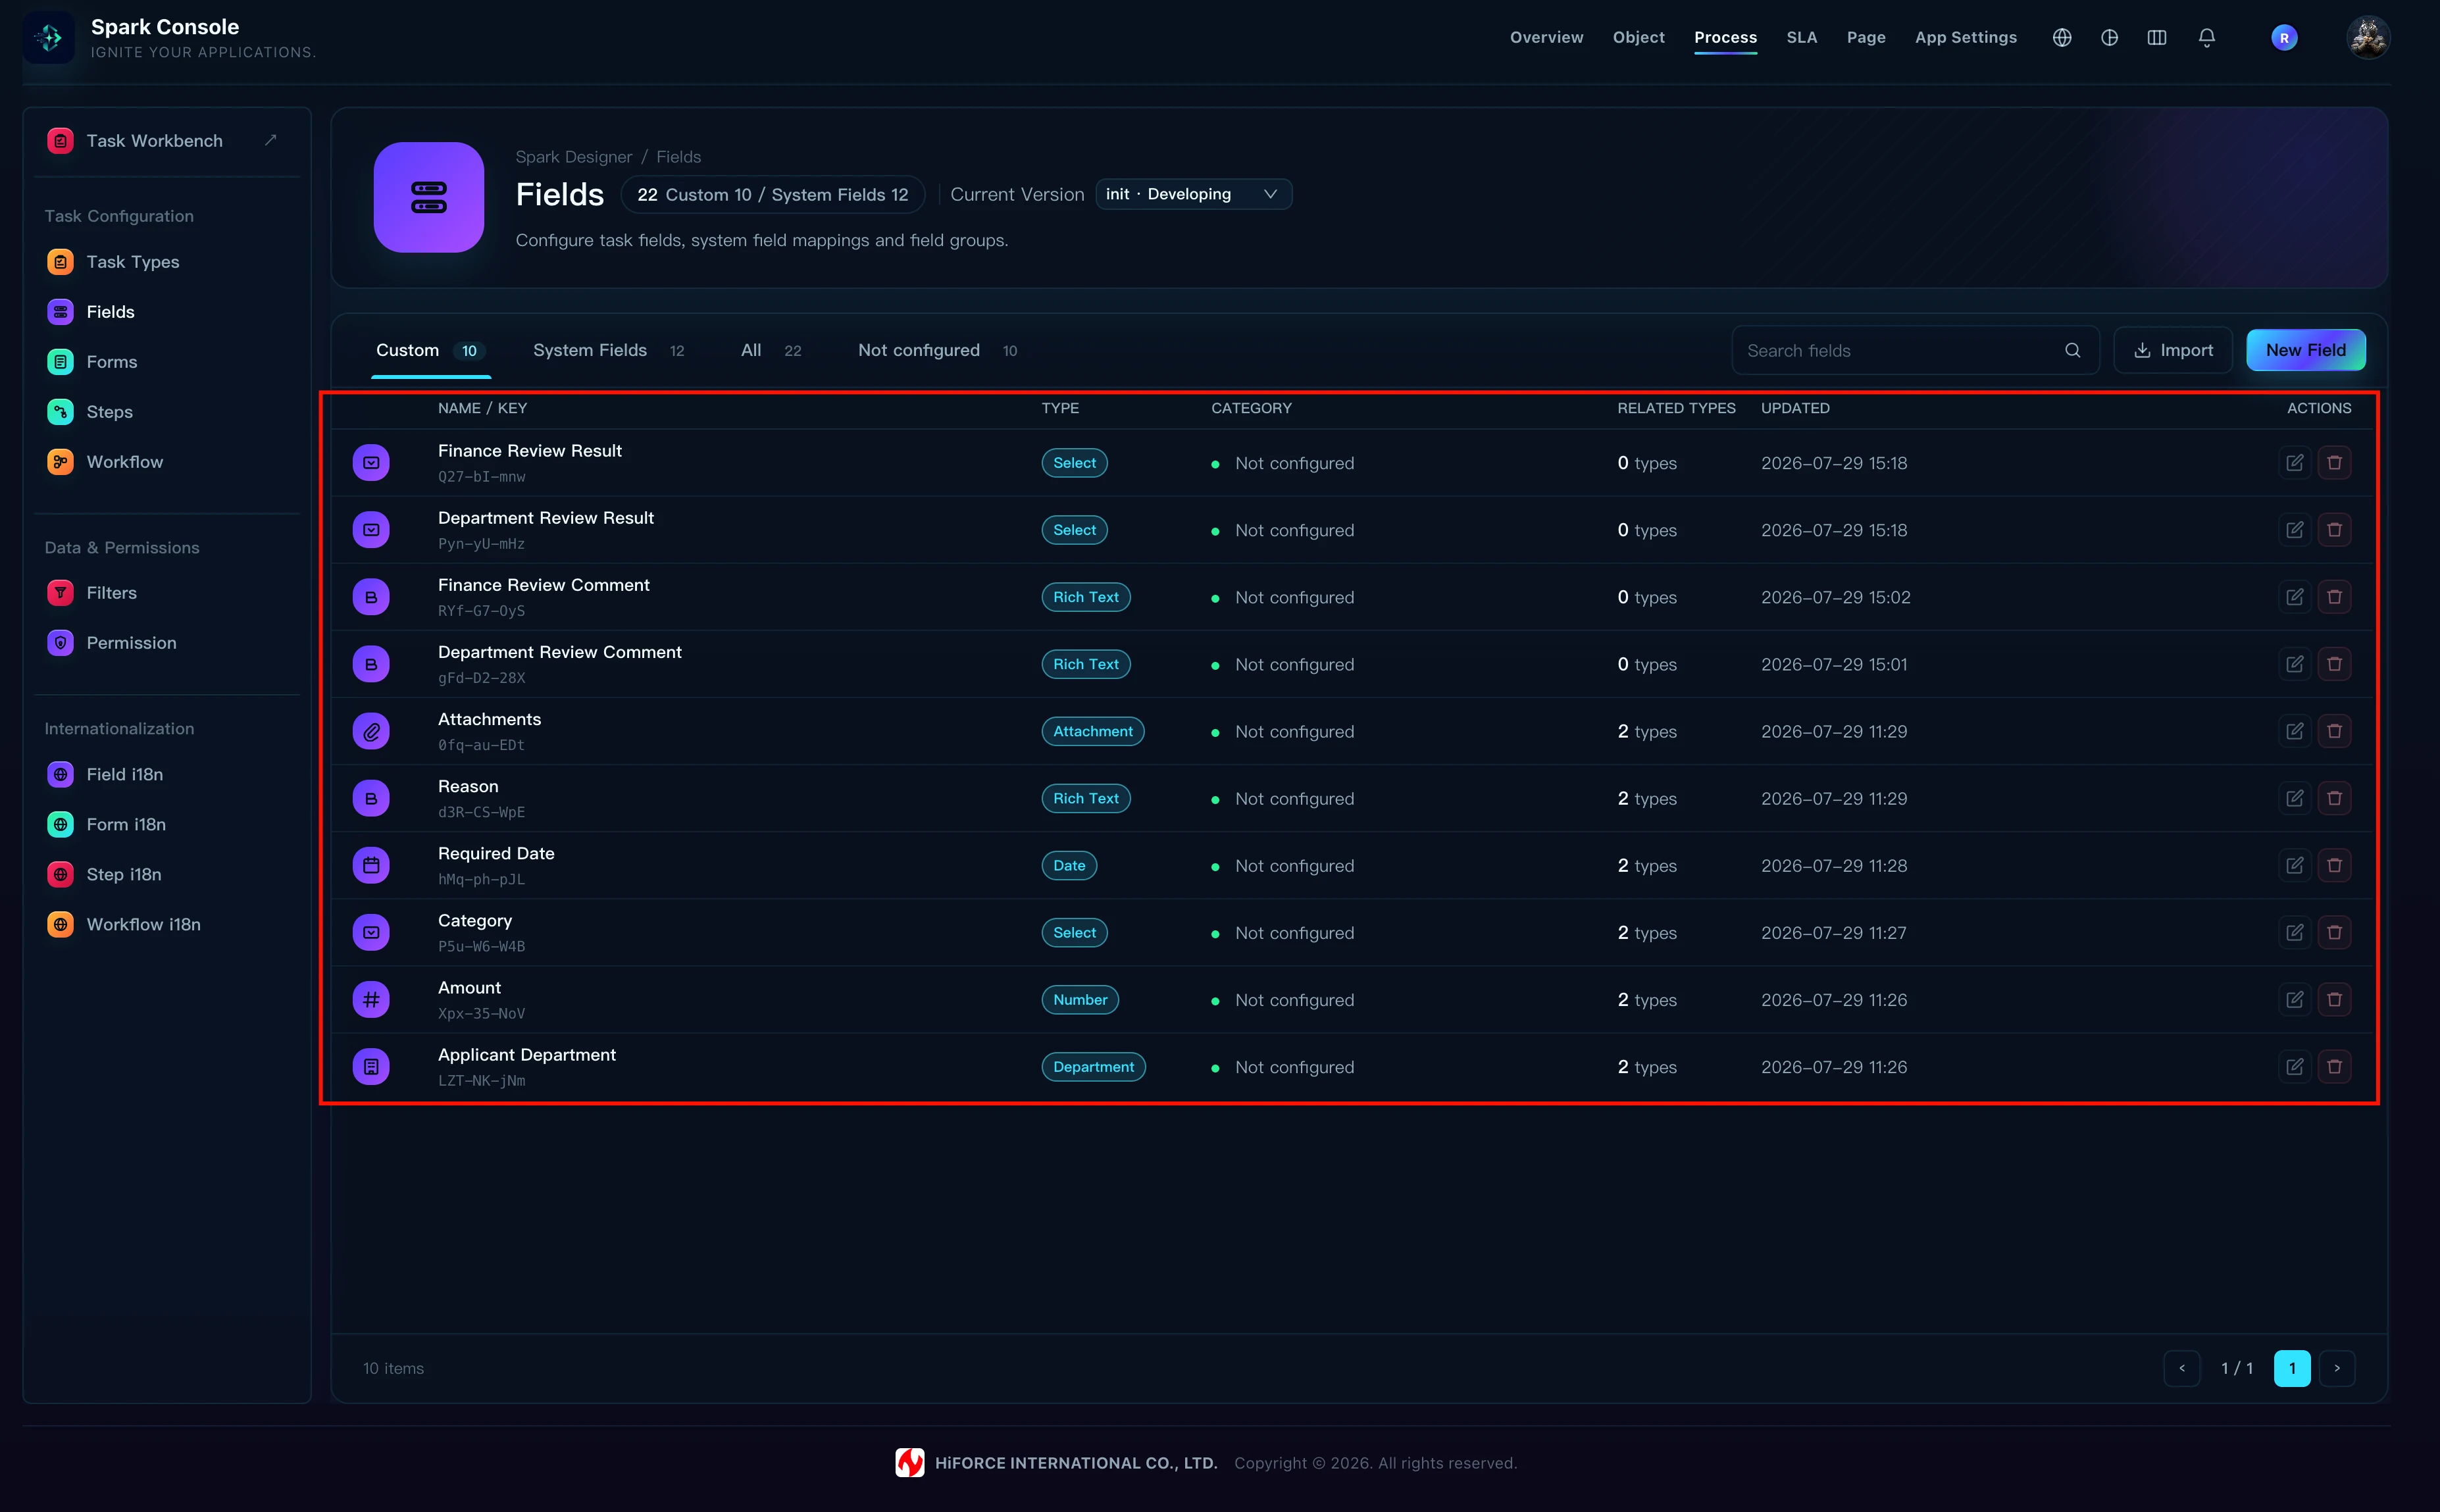
Open Process Designer → Task Configuration → Fields and create these custom fields:
| Label | Field Type | Key configuration |
|---|---|---|
| Applicant Department | Department | Single department selection |
| Amount | Number | Configure a currency unit if needed |
| Category | Select | Hardware, Software, Service |
| Required Date | Date | Date value |
| Reason | Text Area | Long text |
| Attachments | Attachment | Limit the number and file types as needed |
| Department Review Comment | Text Area | Review comment entered by the department manager |
| Department Review Result | Select | Options: Approved, Rejected; written automatically by the workflow |
| Finance Review Comment | Text Area | Review comment entered by the finance approver |
| Finance Review Result | Select | Options: Approved, Rejected; written automatically by the workflow |
The system generates the Field Key when a field is saved. Users do not need to, and cannot, enter it manually. When configuring workflow conditions, assignee rules, or TQL later, select fields from the editor suggestions instead of guessing a key from its Label.
Use system fields for title, status, creator, assignee, created time, and similar properties. Do not create duplicate custom fields with the same meaning.
Do not set a default value for Department Review Result or Finance Review Result, and do not ask the applicant or approver to select one manually. Their initial value remains empty and the Post Function on the corresponding Approve or Reject transition writes the result.
Expected result: The Fields list shows both the system fields and the ten custom fields above.
3. Create forms
First understand the two binding types so that review forms are not mistaken for a fourth Task Type form:
- A Task Type form has only three slots: Create Form, Edit Form, and View Form.
- A transition form is bound to a specific Workflow transition and opens only when a user clicks Approve or Reject.
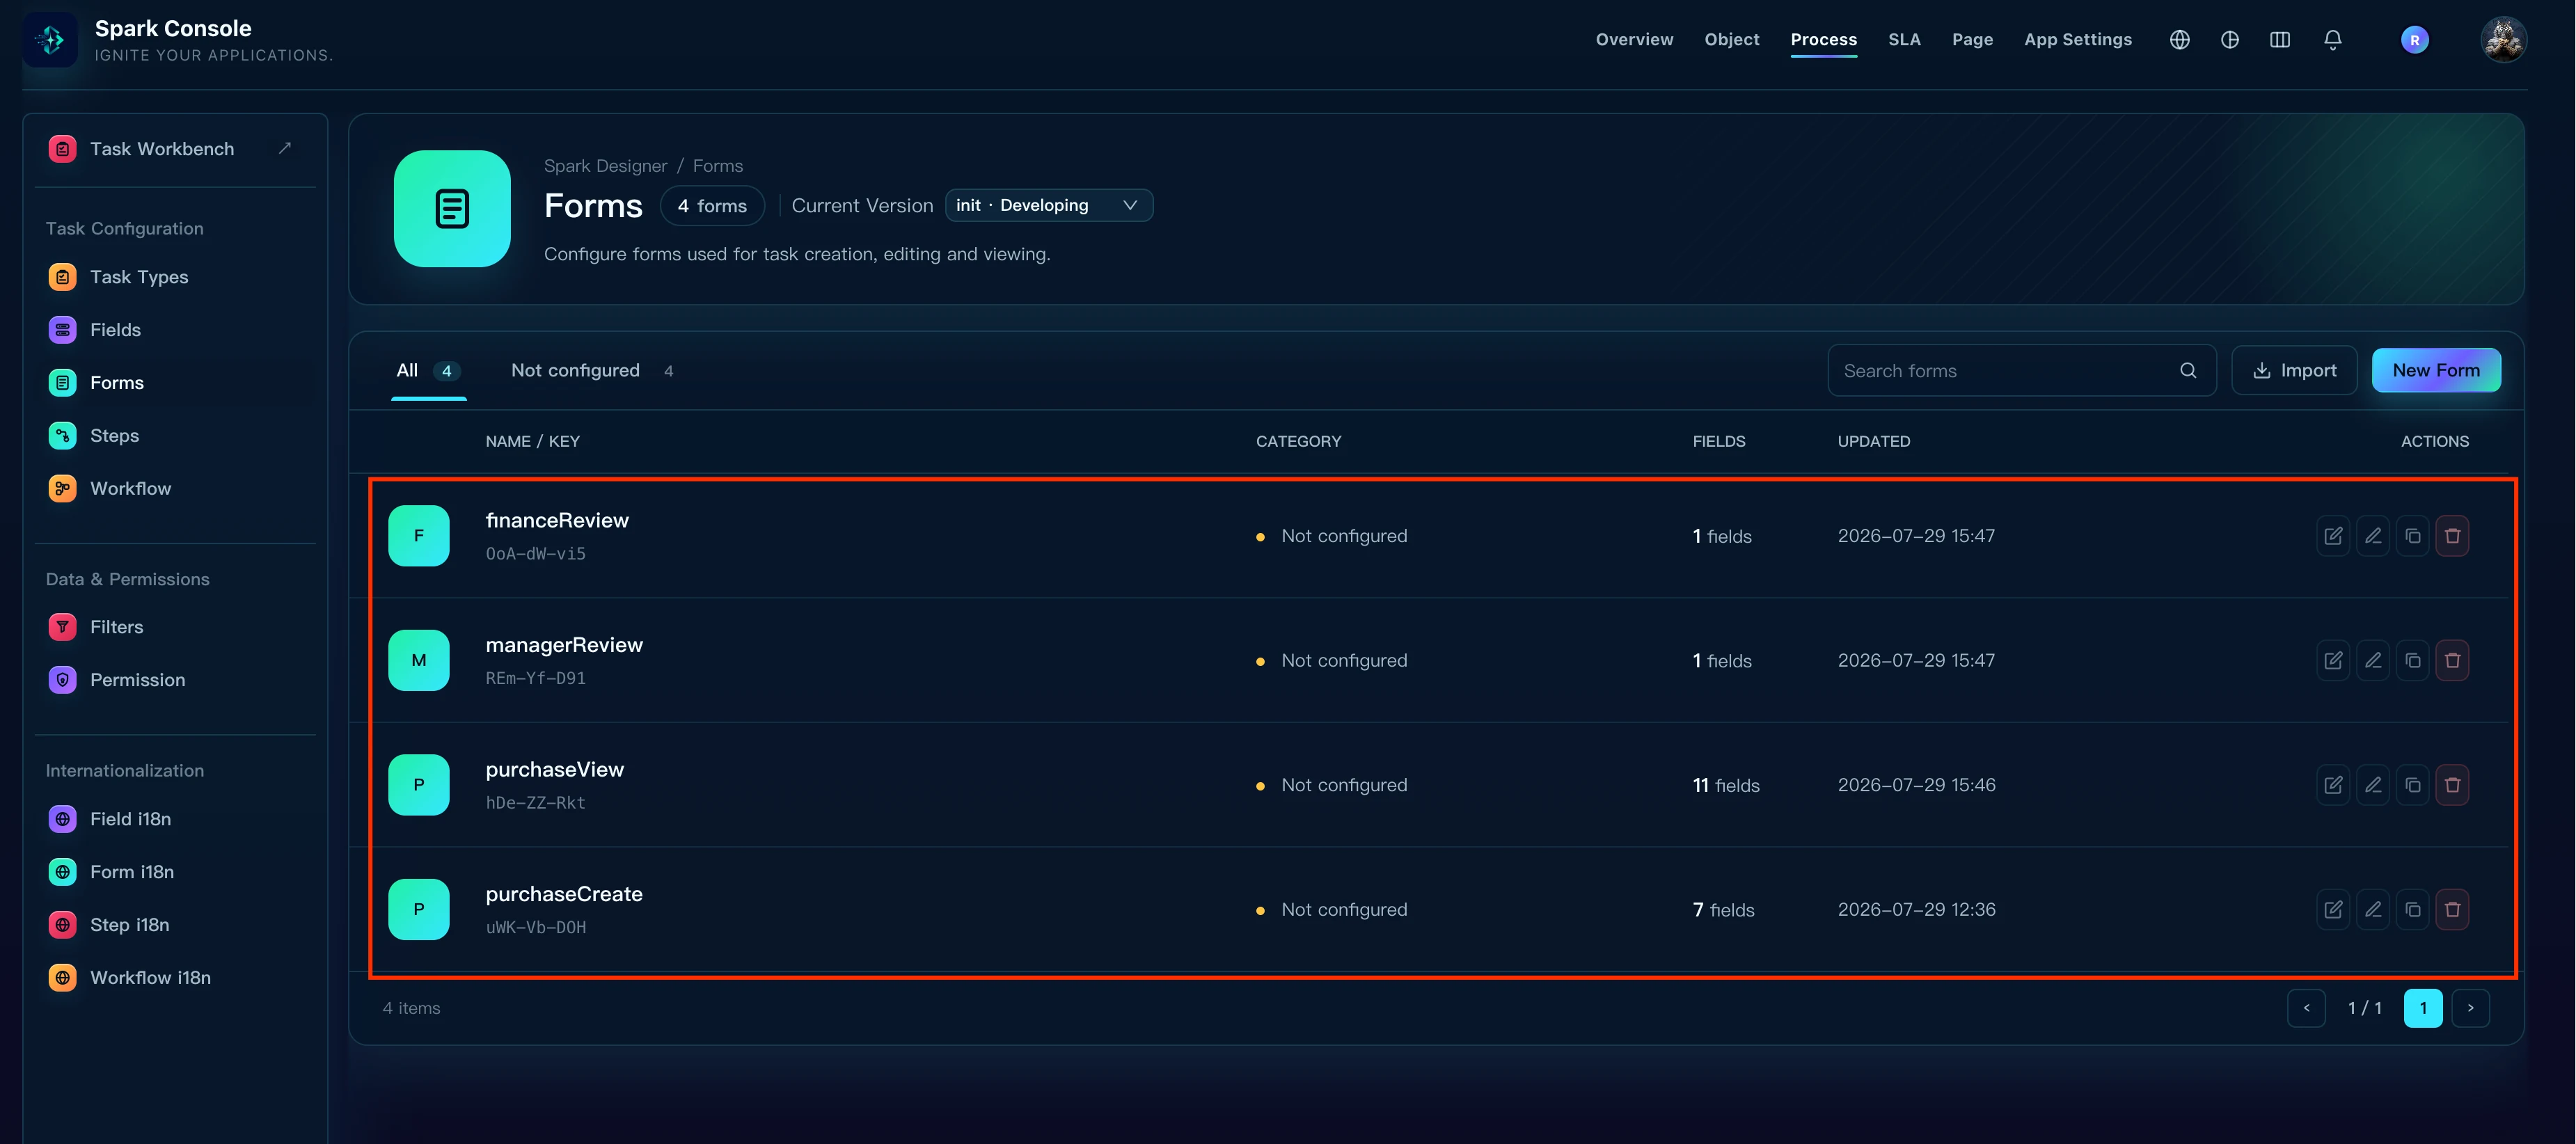
Open Task Configuration → Forms and create these form assets:
purchaseCreate: Create Form. The applicant enters the title, department, amount, category, required date, reason, and attachments when creating a task.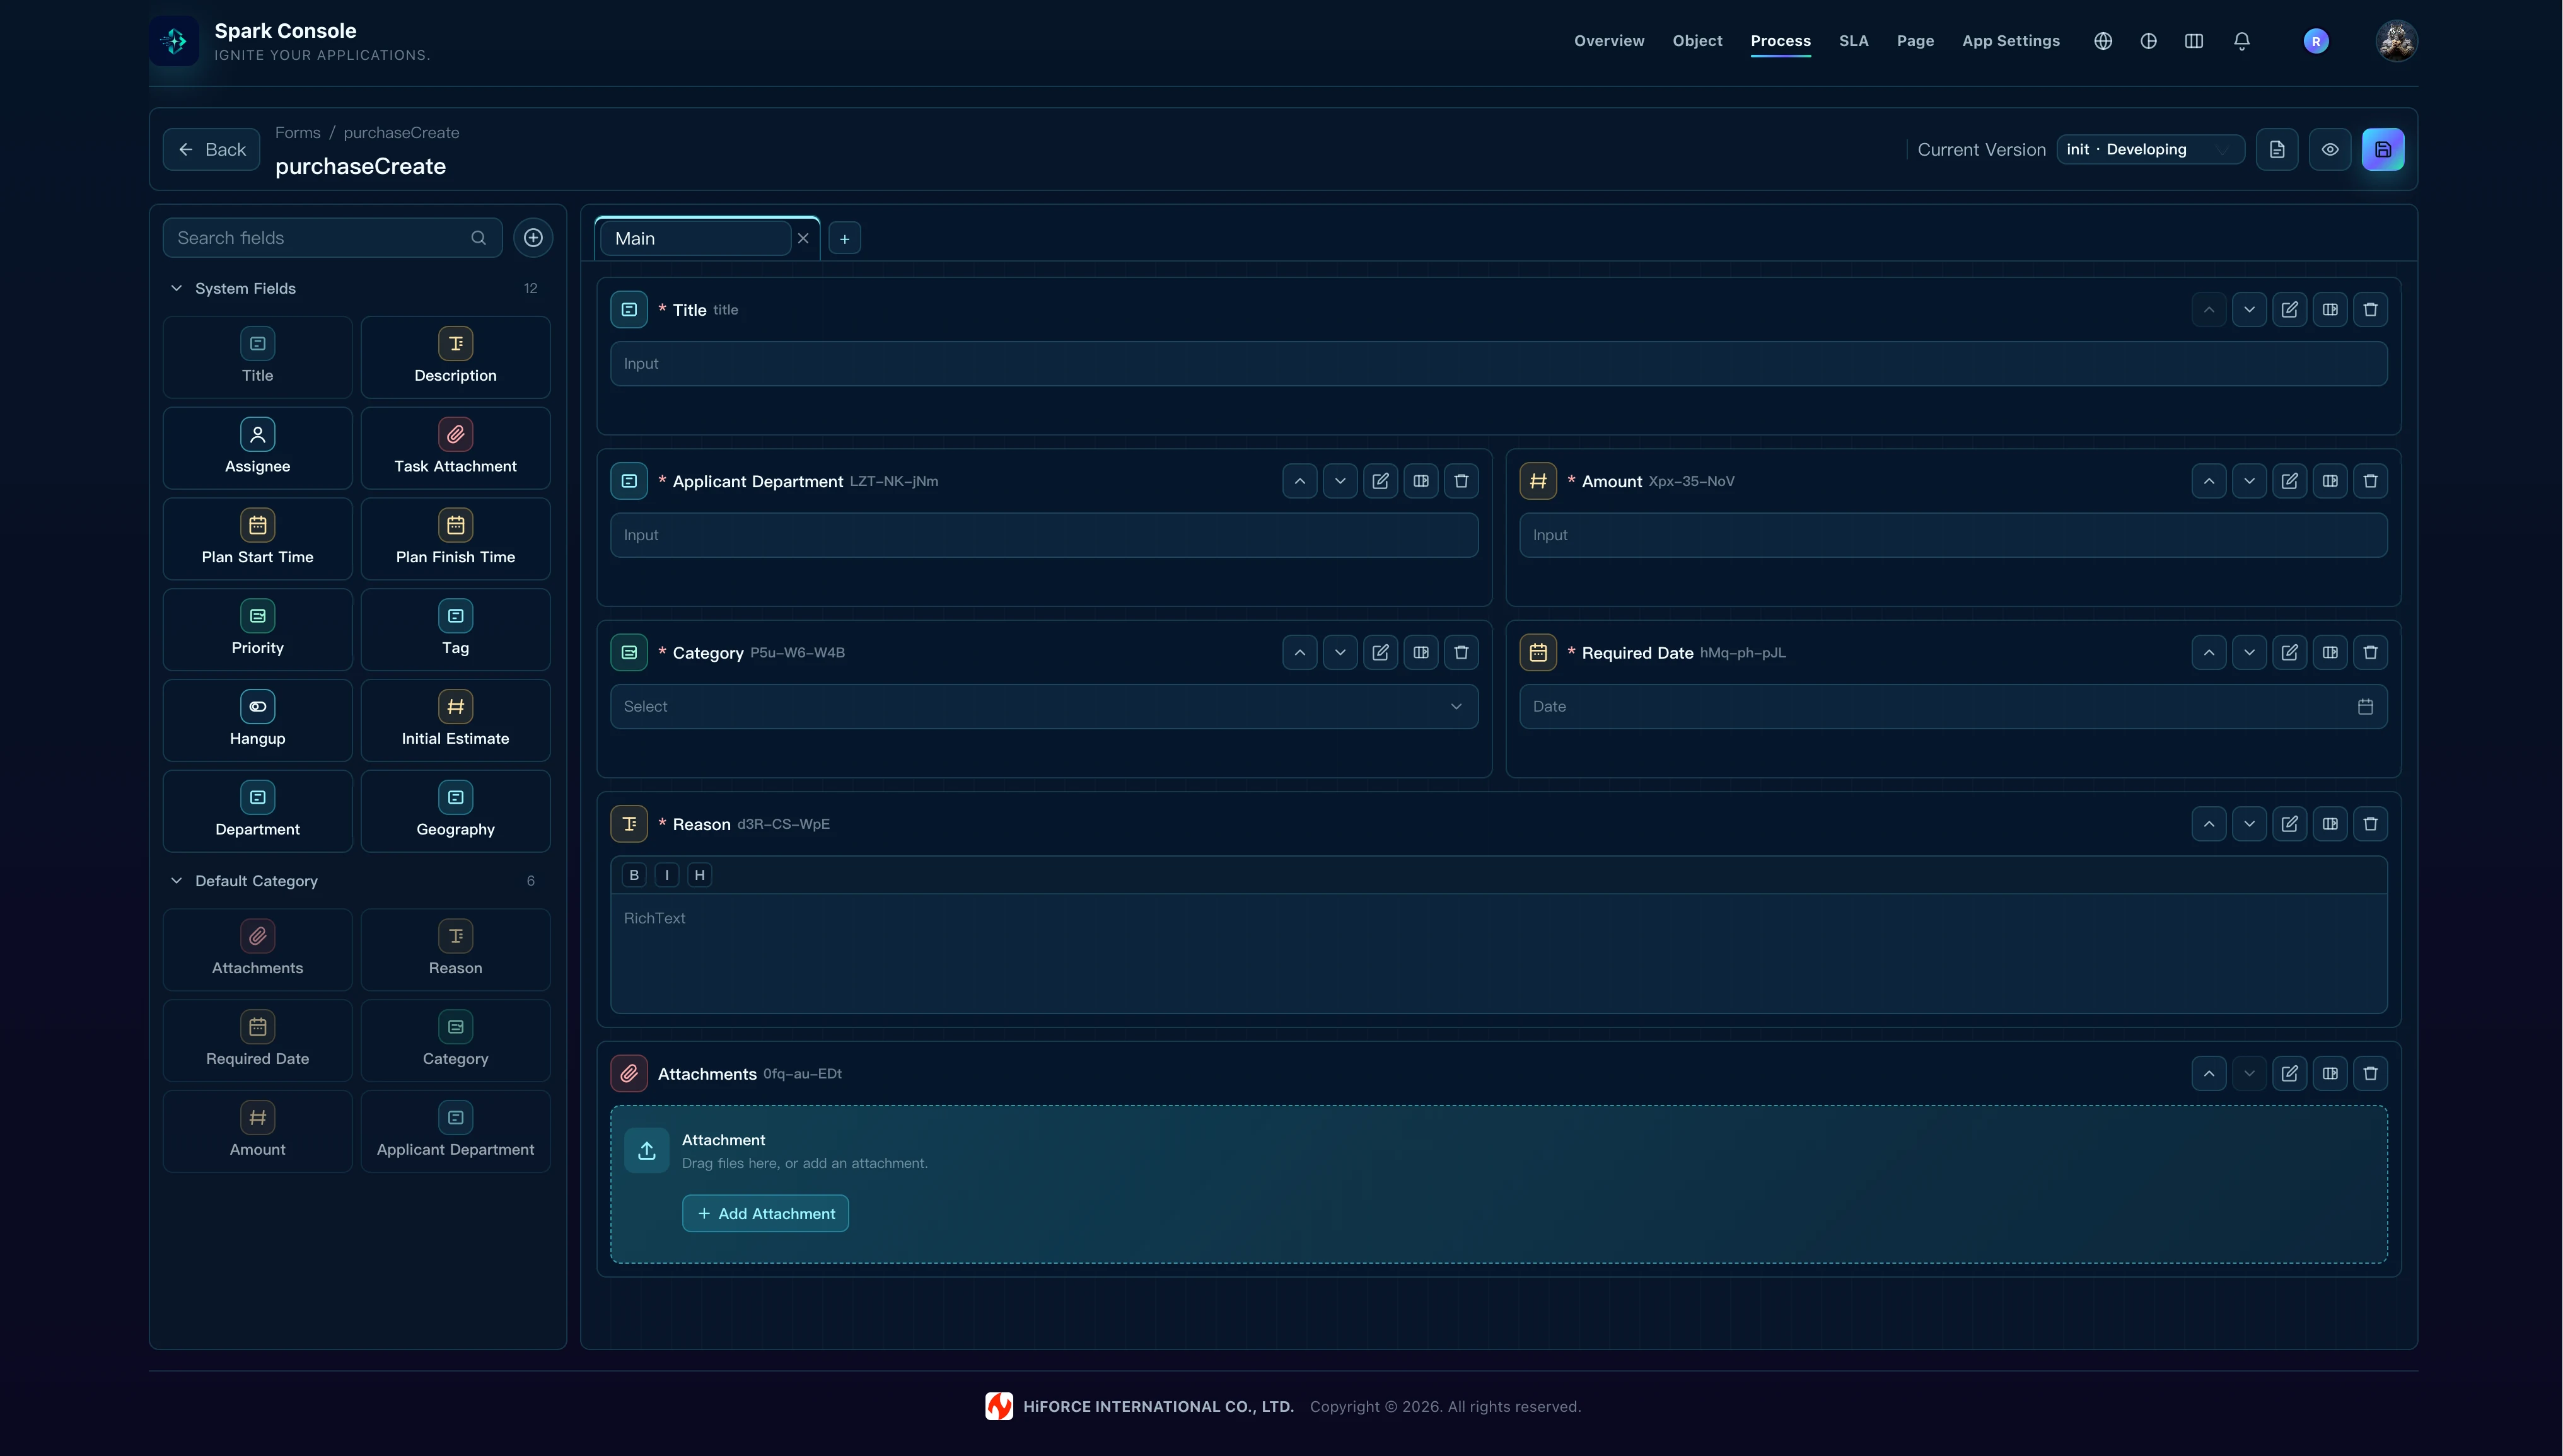
purchaseView: View Form. It displays the request information, Department Review Result, Department Review Comment, Finance Review Result, and Finance Review Comment as a unified read-only task detail. This example does not allow business fields to be edited after submission, so the Edit Form also usespurchaseView. If the business allows applicants to edit an unfinished task, reusepurchaseCreateor create a separatepurchaseEditform.managerReview: Transition form for Department Review. Request information is read-only, and only Department Review Comment is editable by the department manager.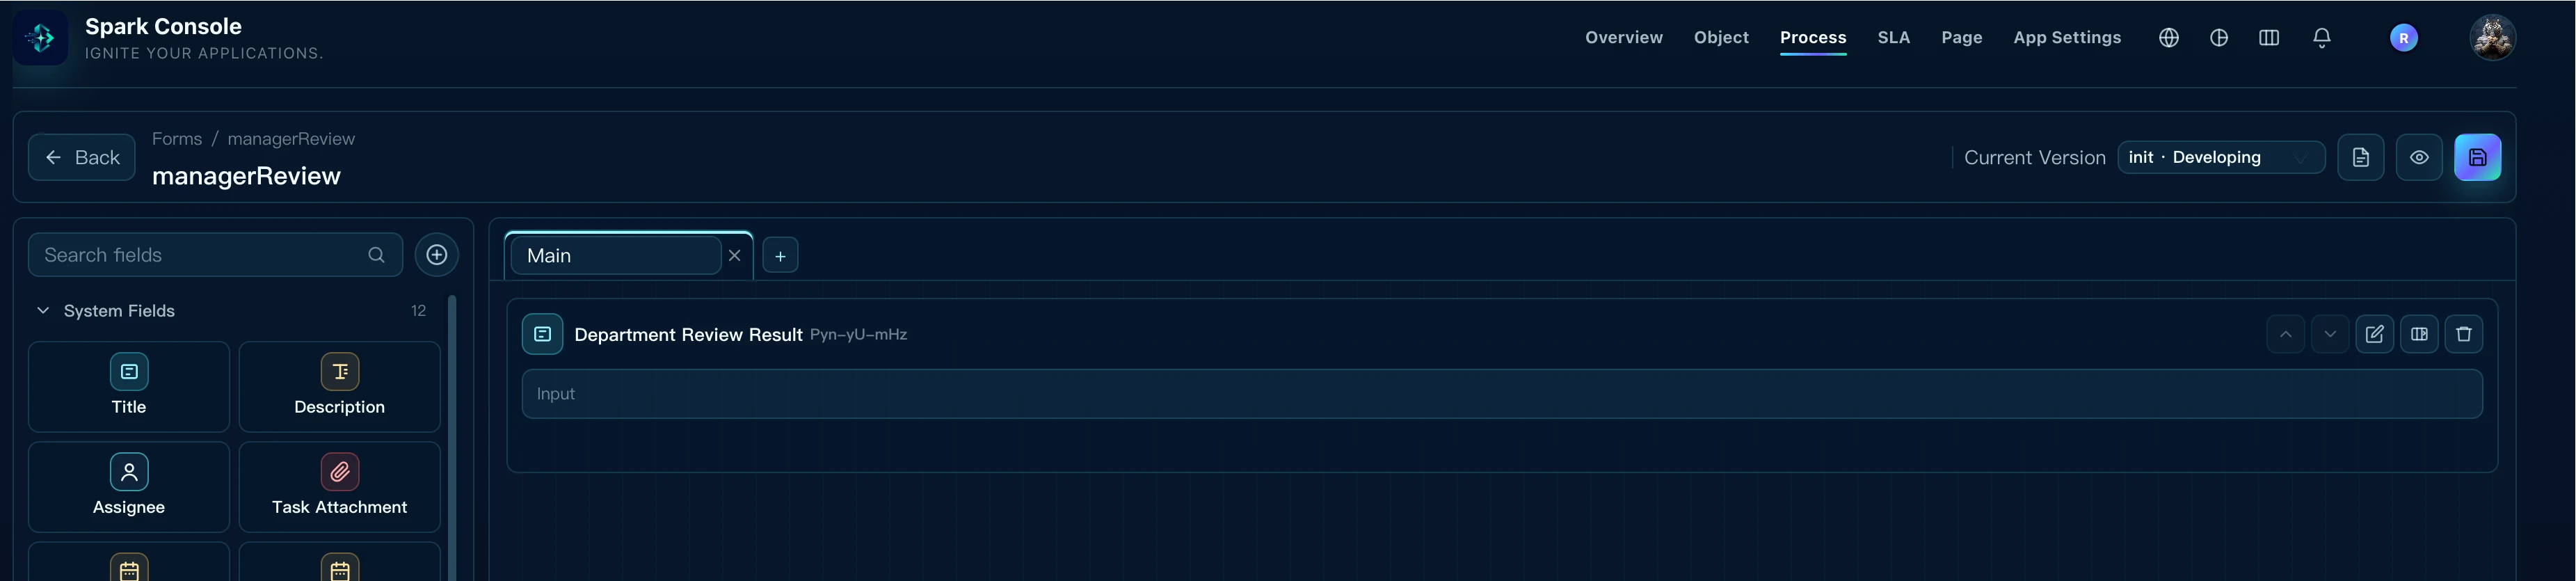
financeReview: Transition form for Finance Review. Request information is read-only, and only Finance Review Comment is editable by the finance approver.
At this point, create only the form assets. You do not need to bind them to a Task Type yet. After the workflow and permission schema are ready, create all references together in section 6.
Expected result: The Forms list contains four form assets: purchaseCreate, purchaseView, managerReview, and financeReview.
4. Create steps and a workflow
In Task Configuration → Steps, create:
- Department Review
- Finance Review
A Step is a reusable business-stage asset that can be referenced by multiple Workflows, not merely the display name of a node in this workflow. After a Human Activity binds to a Step, runtime tasks record its stable stepCode. Cross-workflow reports, TQL, processing-time metrics, and SLA statistics can then aggregate the same business stage across different Workflows.
For example, if both Purchase Approval and Expense Reimbursement require finance approval, bind the finance Human Activity in both workflows to the Finance Review Step created here. You can then calculate task volume, average processing time, and SLA breach rate for Finance Review across both workflows. Do not create separate temporary nodes that only share the same name; without a common Step identifier, they cannot be reliably measured as the same reusable business stage.
The same rule applies to Department Review. Reuse this Step when another workflow has a department review with the same business meaning. If responsibilities, reporting definitions, or SLA definitions differ, create a separate Step so that distinct business stages are not incorrectly combined.
Then open Task Configuration → Workflows and create:
- Name: Purchase Approval
- Key: Enter a stable identifier that follows the UI rules, such as
PURCHASEAPPROVAL. Do not change the Key merely to rename its display label after saving. - Category: Procurement
- Allow Revoke: Enable it if required by the business.
Configure the canvas as follows:
Start → Department Review → Amount Gateway
                         ├─ Low amount → Approved
                         └─ High amount → Finance Review → Approved

Department Review / Finance Review rejected → Rejected

The configuration in the diagram consists of routing, assignees, forms, validation, and result updates:
- Bind
purchaseCreateas Create Form andpurchaseViewas View / Edit Form on the Task Type. - Resolve the Department Review assignee as the department manager of Applicant Department. Assign the Finance Approver role to Finance Review.
- Route Department Review approval to Amount Gateway. Set
Amount < 10000on the low-amount transition to go directly to Approved, andAmount >= 10000on the high-amount transition to enter Finance Review. - Select the Approve and Reject outgoing transitions of Department Review, then choose
managerReviewunder Transition Form in the right panel. - Select the Approve and Reject outgoing transitions of Finance Review, then choose
financeReviewunder Transition Form in the right panel. - Keep Show Button enabled and set a clear transition name, confirmation message, and prompt for each transition.
- Add required validation for review comments: validate Department Review Comment on department transitions and Finance Review Comment on finance transitions.
- Add Functions → Set Task Field to the Department Review Approve transition. Select Department Review Result for Field Name and enter
Approvedfor Field Value. - Add Functions → Set Task Field to the Department Review Reject transition. Select Department Review Result for Field Name and enter
Rejectedfor Field Value. - Configure Finance Review Result the same way on the Finance Review Approve and Reject transitions, writing
ApprovedandRejectedrespectively.
The same review form can be bound to both the Approve and Reject transitions of a node. Whether the assignee approves or rejects, Spark first opens the corresponding transition form and requires a review comment. After validation passes and the transition succeeds, Set Task Field writes the result that matches the transition actually selected. Finally, purchaseView presents the comments and results together in read-only mode.
Do not make a Result field an editable Select for the approver, and do not rely only on a form button to change what the page displays. Configure the result in Functions on the corresponding transition so that the persisted field value always matches the actual Approve or Reject route.
When configuring conditions, validators, and Functions, select fields from the editor suggestions. Do not manually copy a field Label or a system-generated Field Key, which can save a reference that the designer cannot resolve or display correctly.
The following image shows the configured workflow:
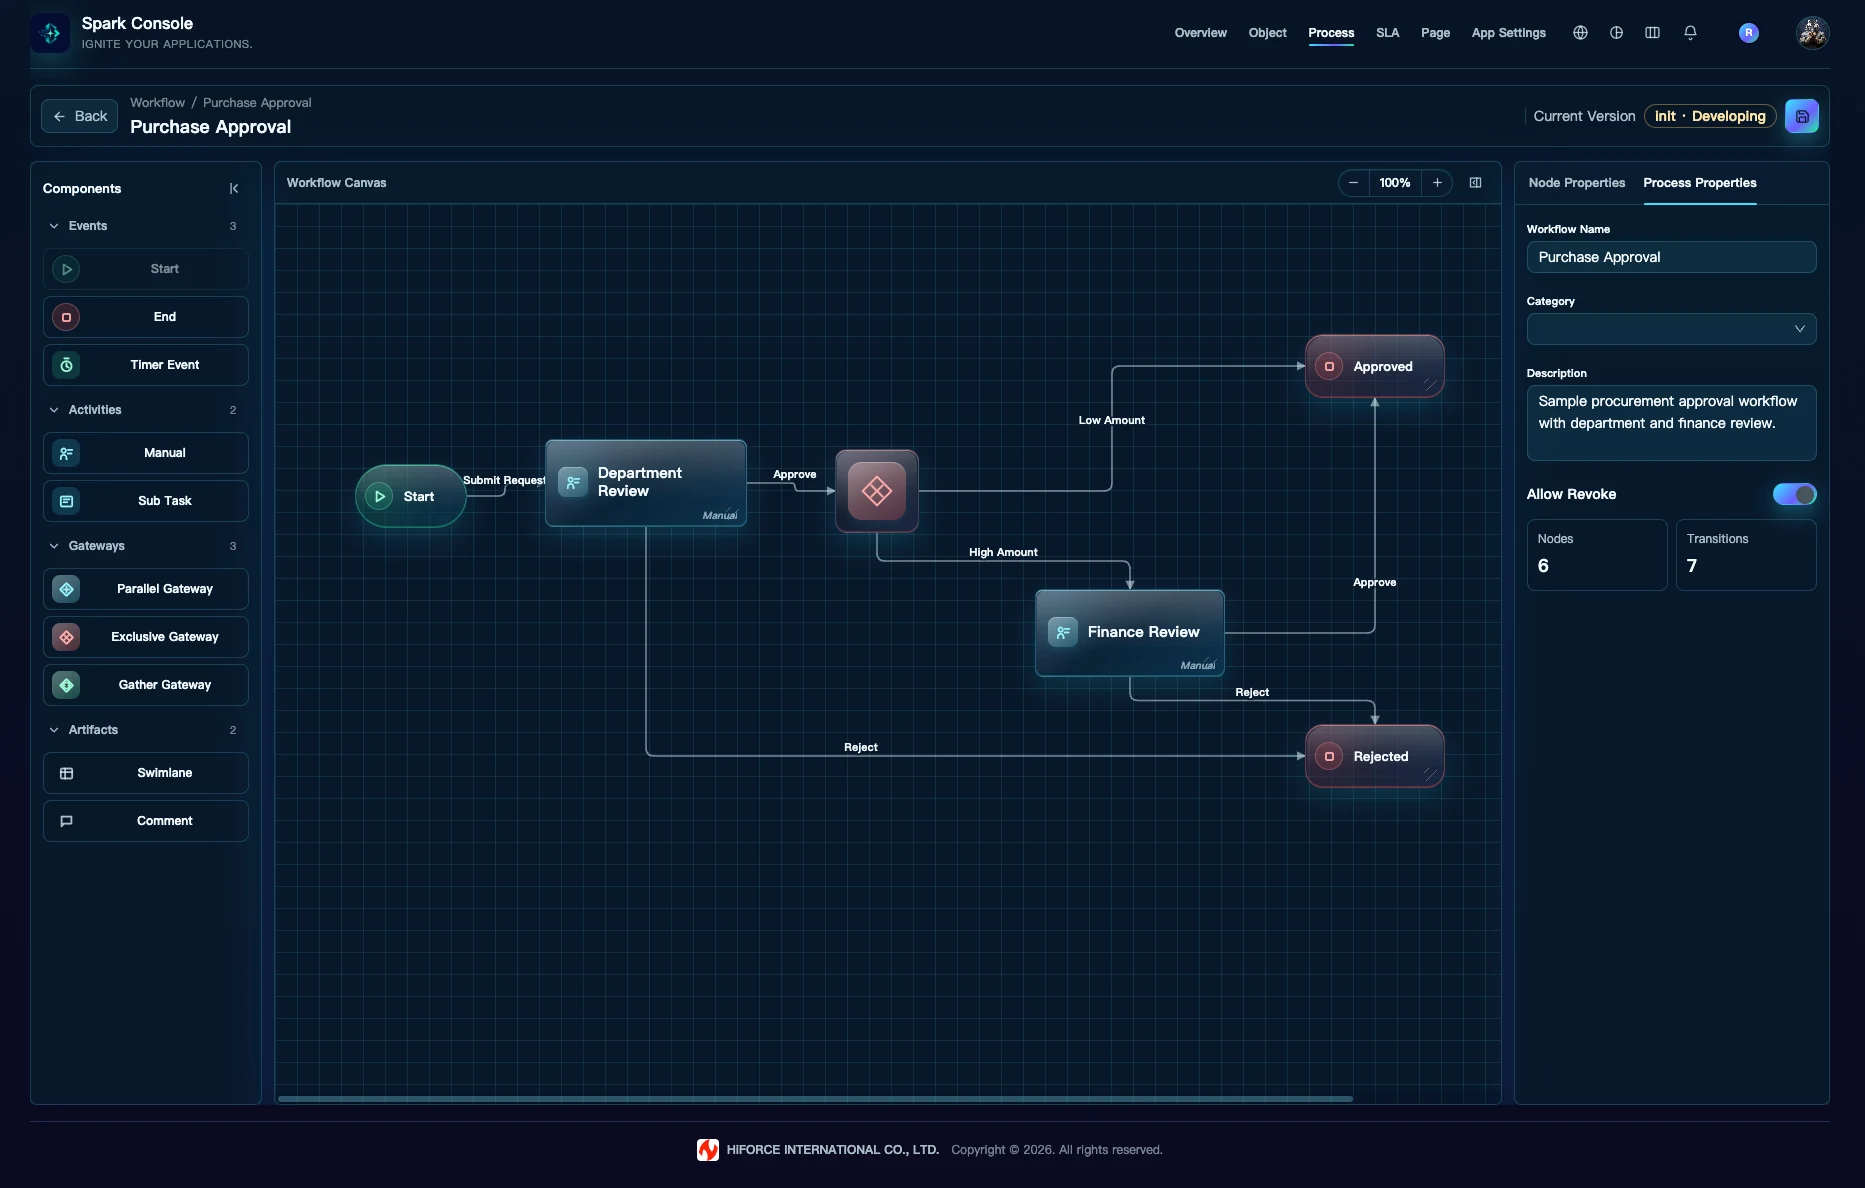
Expected result: After saving, the workflow has no disconnected nodes and every end node has a complete path from Start.
If you have completed Spark CLI installation and authentication and installed the Codex integration or Claude Code integration, describe the workflow requirements directly to the AI. It can use semantic Spark CLI commands to create nodes, connect routes, bind Steps and forms, and configure Conditions, Validators, and Post Functions.
Include the target App, design version, nodes, branch conditions, assignees, transition forms, validation rules, and field update rules in your request. For example:
Configure Purchase Approval in the current DEVELOPING version of spark-sample:
Reuse the Department Review and Finance Review Steps. After department approval,
branch by Amount: approve directly below 10000, and enter finance review at or above
10000. End as Rejected if either review is rejected. Bind managerReview and
financeReview to the department and finance transitions, and require review comments.
After Approve / Reject, write the corresponding Review Result as Approved / Rejected.
Before writing, show the target App, version, workflow, and complete change list. Wait
for my confirmation, then apply the changes and run the workflow check.
AI-assisted configuration does not replace design review. Before confirming, verify the target App, version, and workflow. After changes are applied, inspect the graphical structure in Process Designer and validate real users, permissions, organization data, and branches in the appropriate runtime environment. See Semantic Workflow Editing for commands and a complete example.
5. Create a permission schema
When configuring permissions for the first time, you do not need to create every grant rule from an empty schema. In Data & Permission → Permissions, click Import System Default to copy an editable default permission schema:
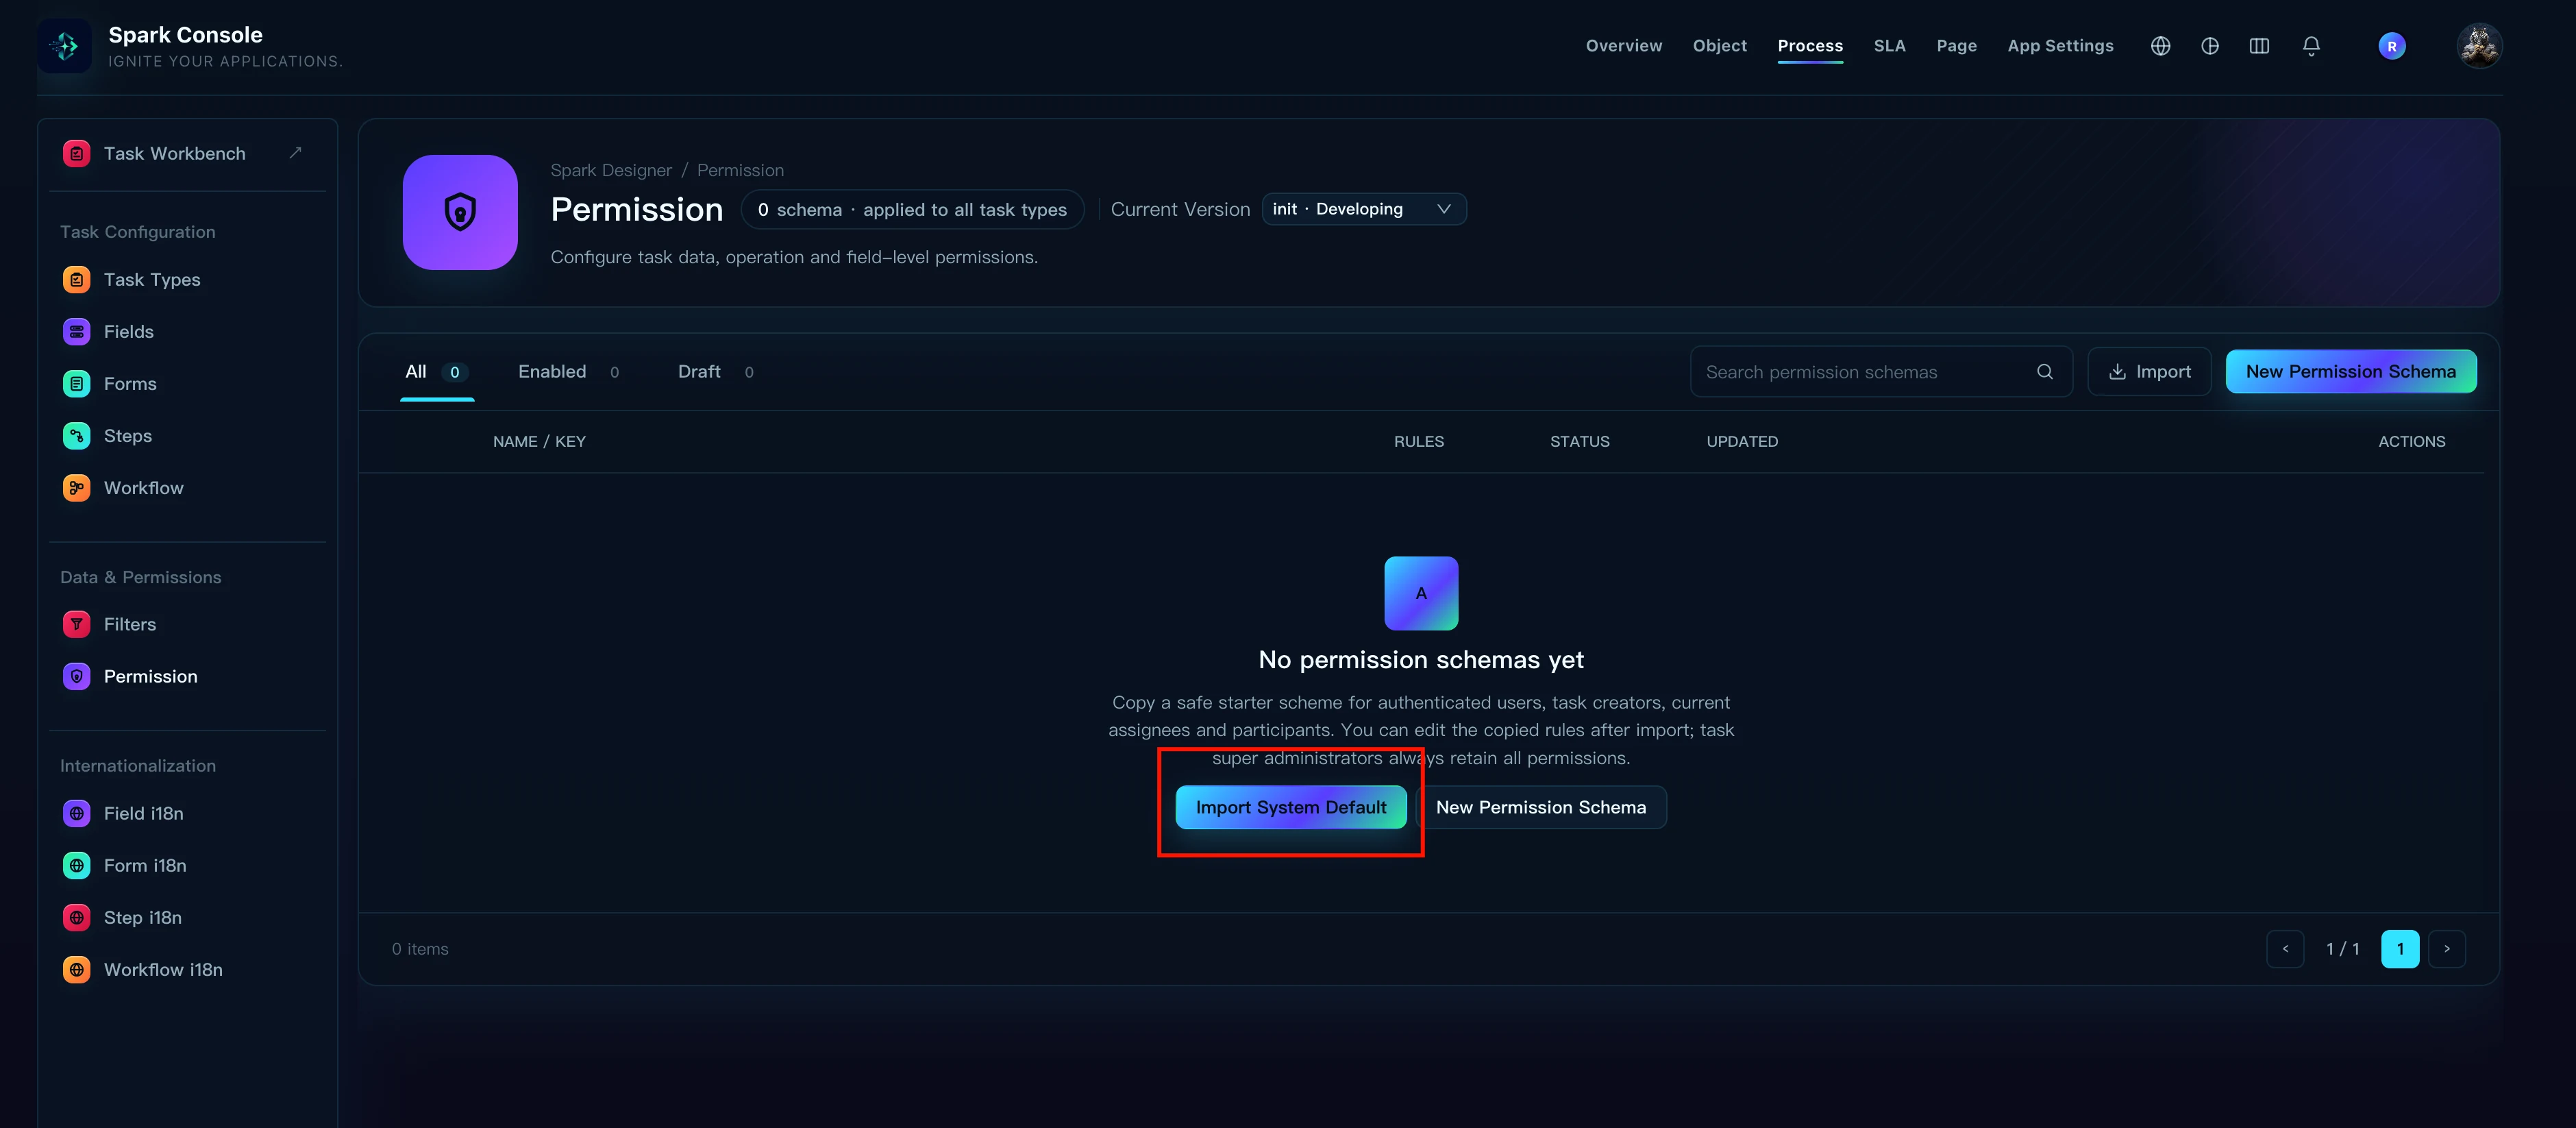
Open Configure after importing and review the grant rules. To distinguish multiple task types, use Edit to rename the schema to Purchase Request Permission. The screenshot in this example retains the imported name, Default Task Permission. If you already created an empty schema manually, open Configure and import the same default rules from the empty state.
Each row in the schema is a Permission Item + Grant Type + optional Grant Parameter rule. For this example, the imported default schema already contains these key rules:
| Permission Item | Grant Type | Purpose in the procurement workflow |
|---|---|---|
| Create Task | System User | Allows signed-in users to create procurement requests |
| View Task | Task Creator | Allows the Applicant to view a request they created |
| View Task | Current Assignee | Allows a Department Manager or Finance Approver to view an assigned task |
| View Task | Historical Assignee | Allows an approver who already processed the task to continue viewing it |
| Transition Task | Current Assignee | Allows only the current assignee to run transitions such as Approve or Reject |
| Revoke Task | Task Creator | Allows the Applicant to revoke their request according to workflow rules |
| Log Work | Current Assignee | Allows the current assignee to log work; it does not control Approve or Reject |
You do not need an extra System Role grant for View Task or Transition Task for Finance Approver. The Finance Approver role is used to assign the Finance Review node in the Workflow. After a high-value request enters that node, the actual user receiving the task becomes Current Assignee and automatically receives the view and transition permissions above. Granting View Task directly to the entire Finance Approver system role would allow every user with that role to view all procurement tasks bound to this permission schema, not only tasks on the high-value branch.
If Applicants must edit tasks after submission, add Edit Task + Task Creator. Whether editing is available in a particular status must also be controlled by workflow status and available operations. The actual Permission Item, Grant Type, and Grant Parameter choices come from extensions registered in the current system; always select them from the UI candidates.
6. Create a Task Type
Open Task Configuration → Task Types and create:
- Task Type Key:
PURCHASE - Task Type Name: Purchase Request
- Category: Procurement
- Default Workflow: Purchase Approval
- Permission Schema: Select the schema reviewed in section 5. The screenshot uses Default Task Permission.
- Create Form:
purchaseCreate - View Form:
purchaseView - Edit Form:
purchaseView
Do not bind managerReview or financeReview on the Task Type. They are already bound to specific Workflow transitions through Transition Form.
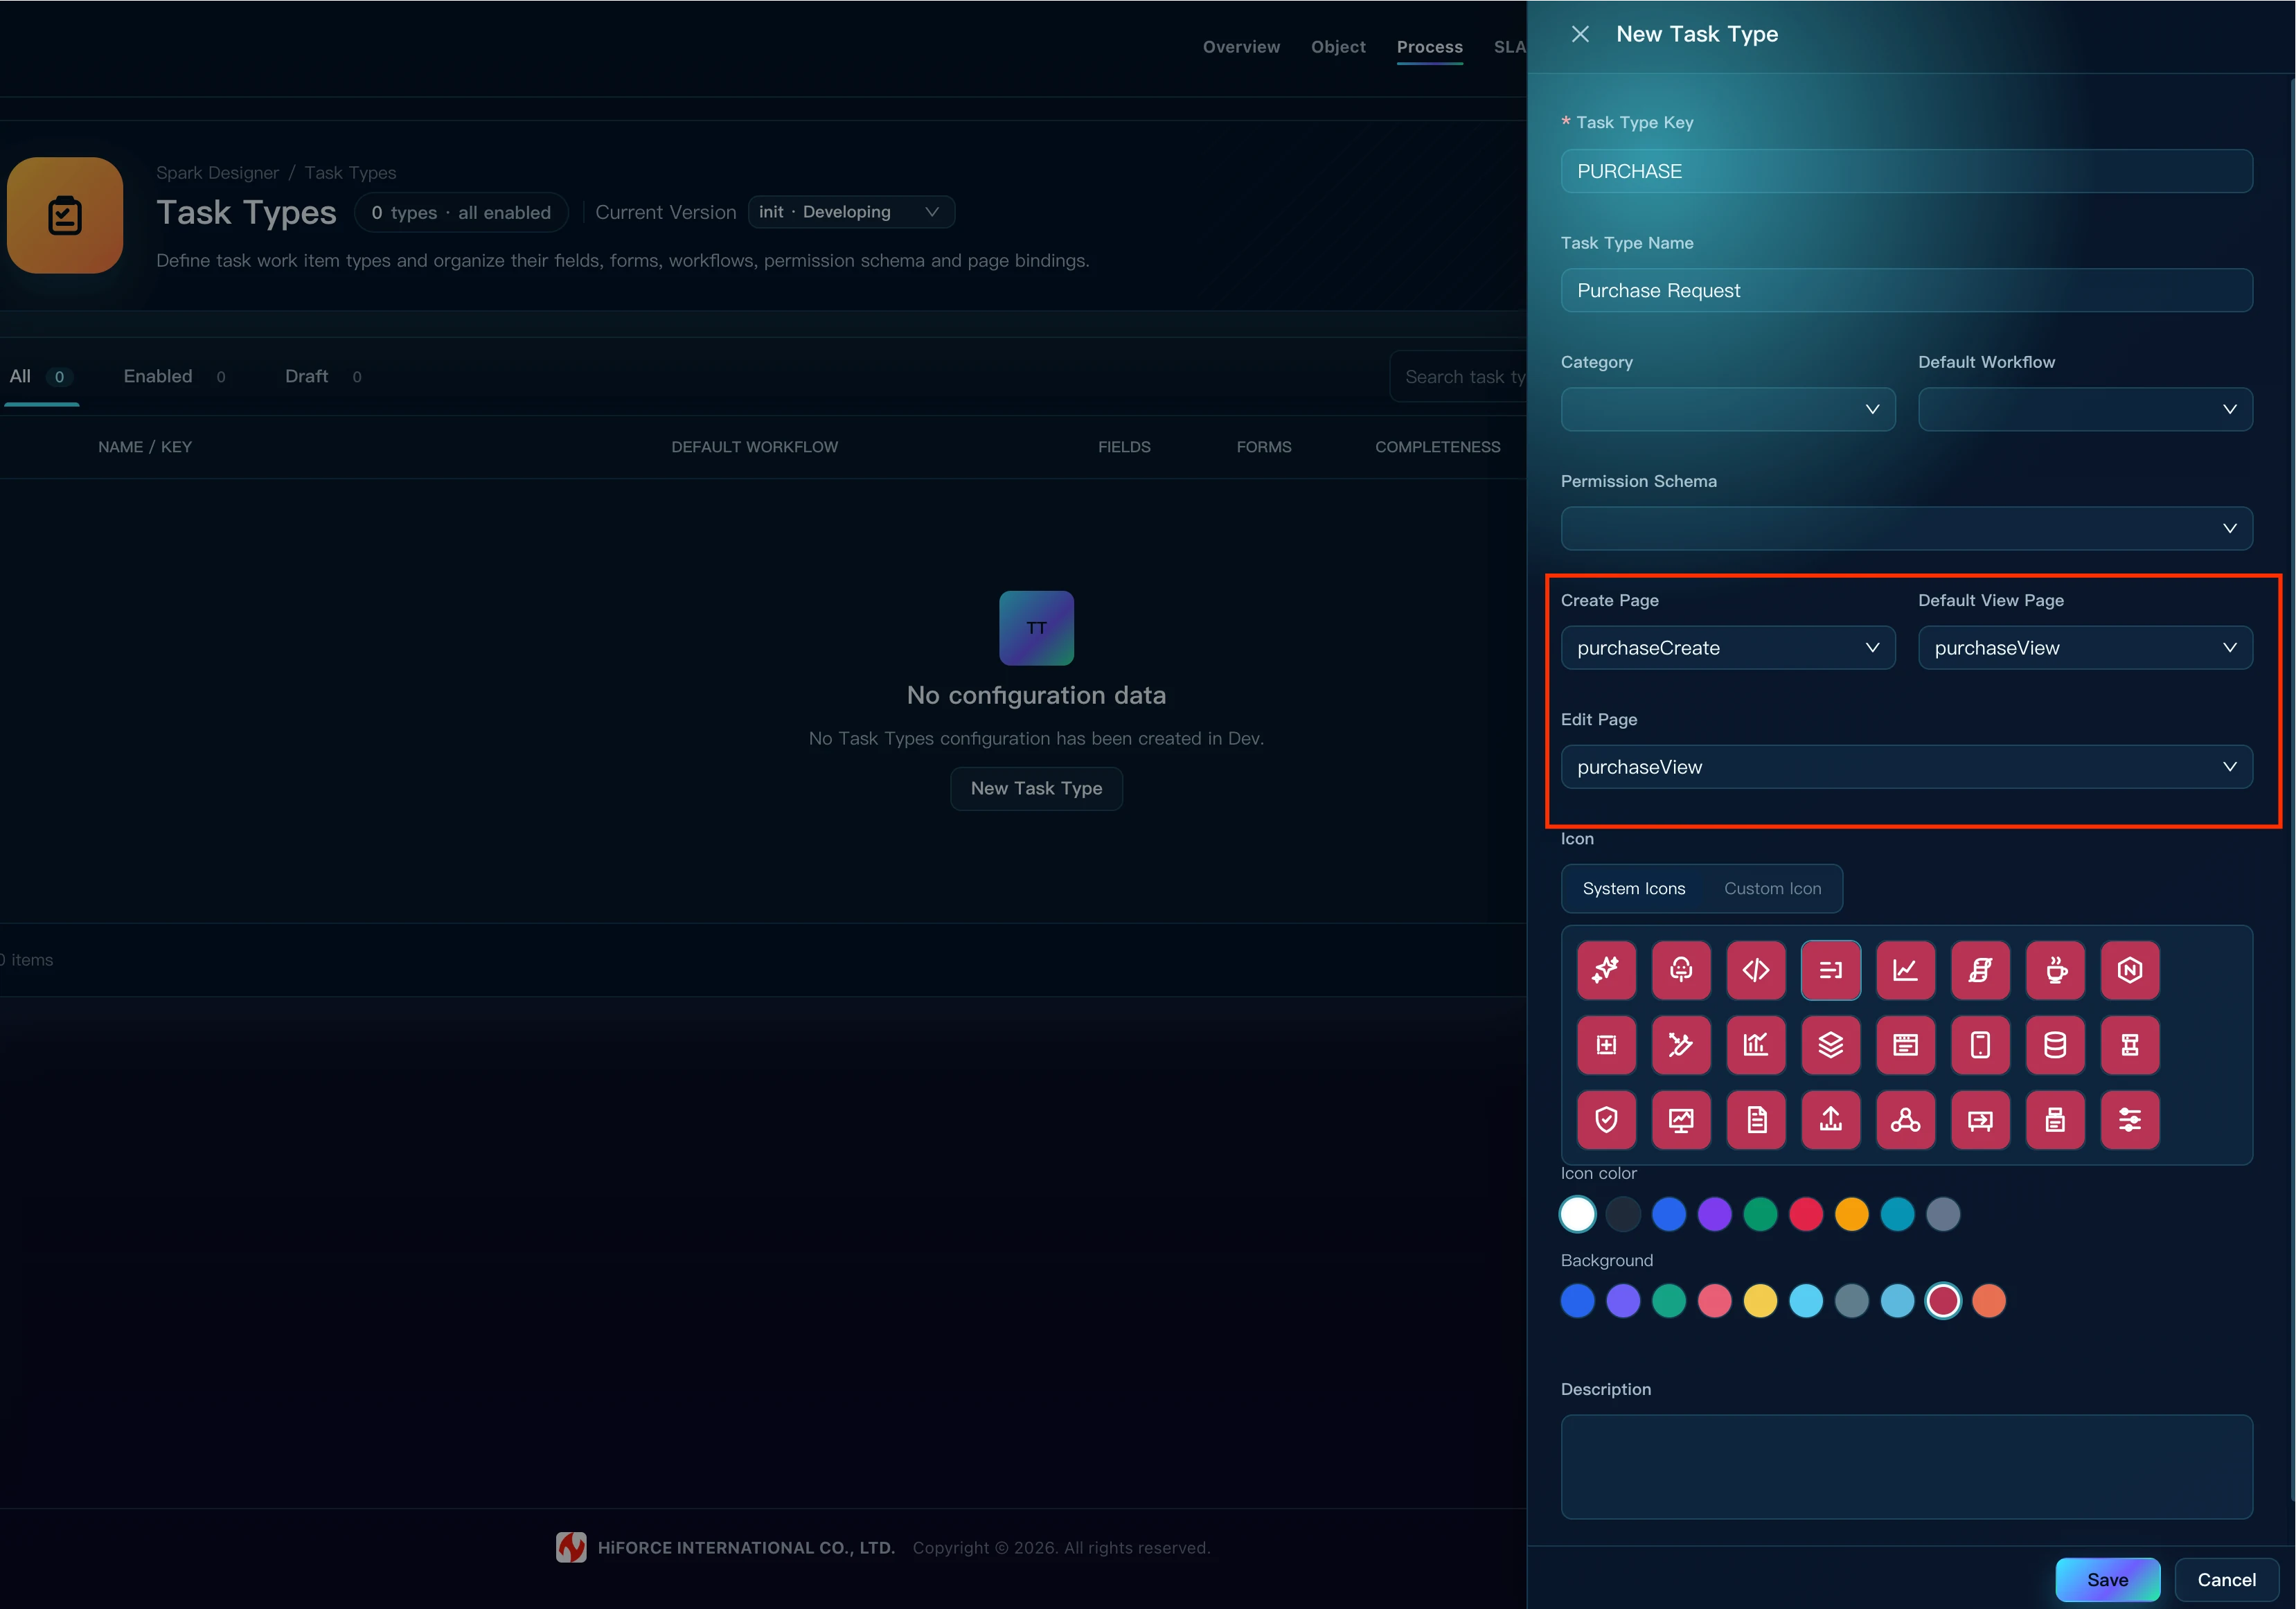
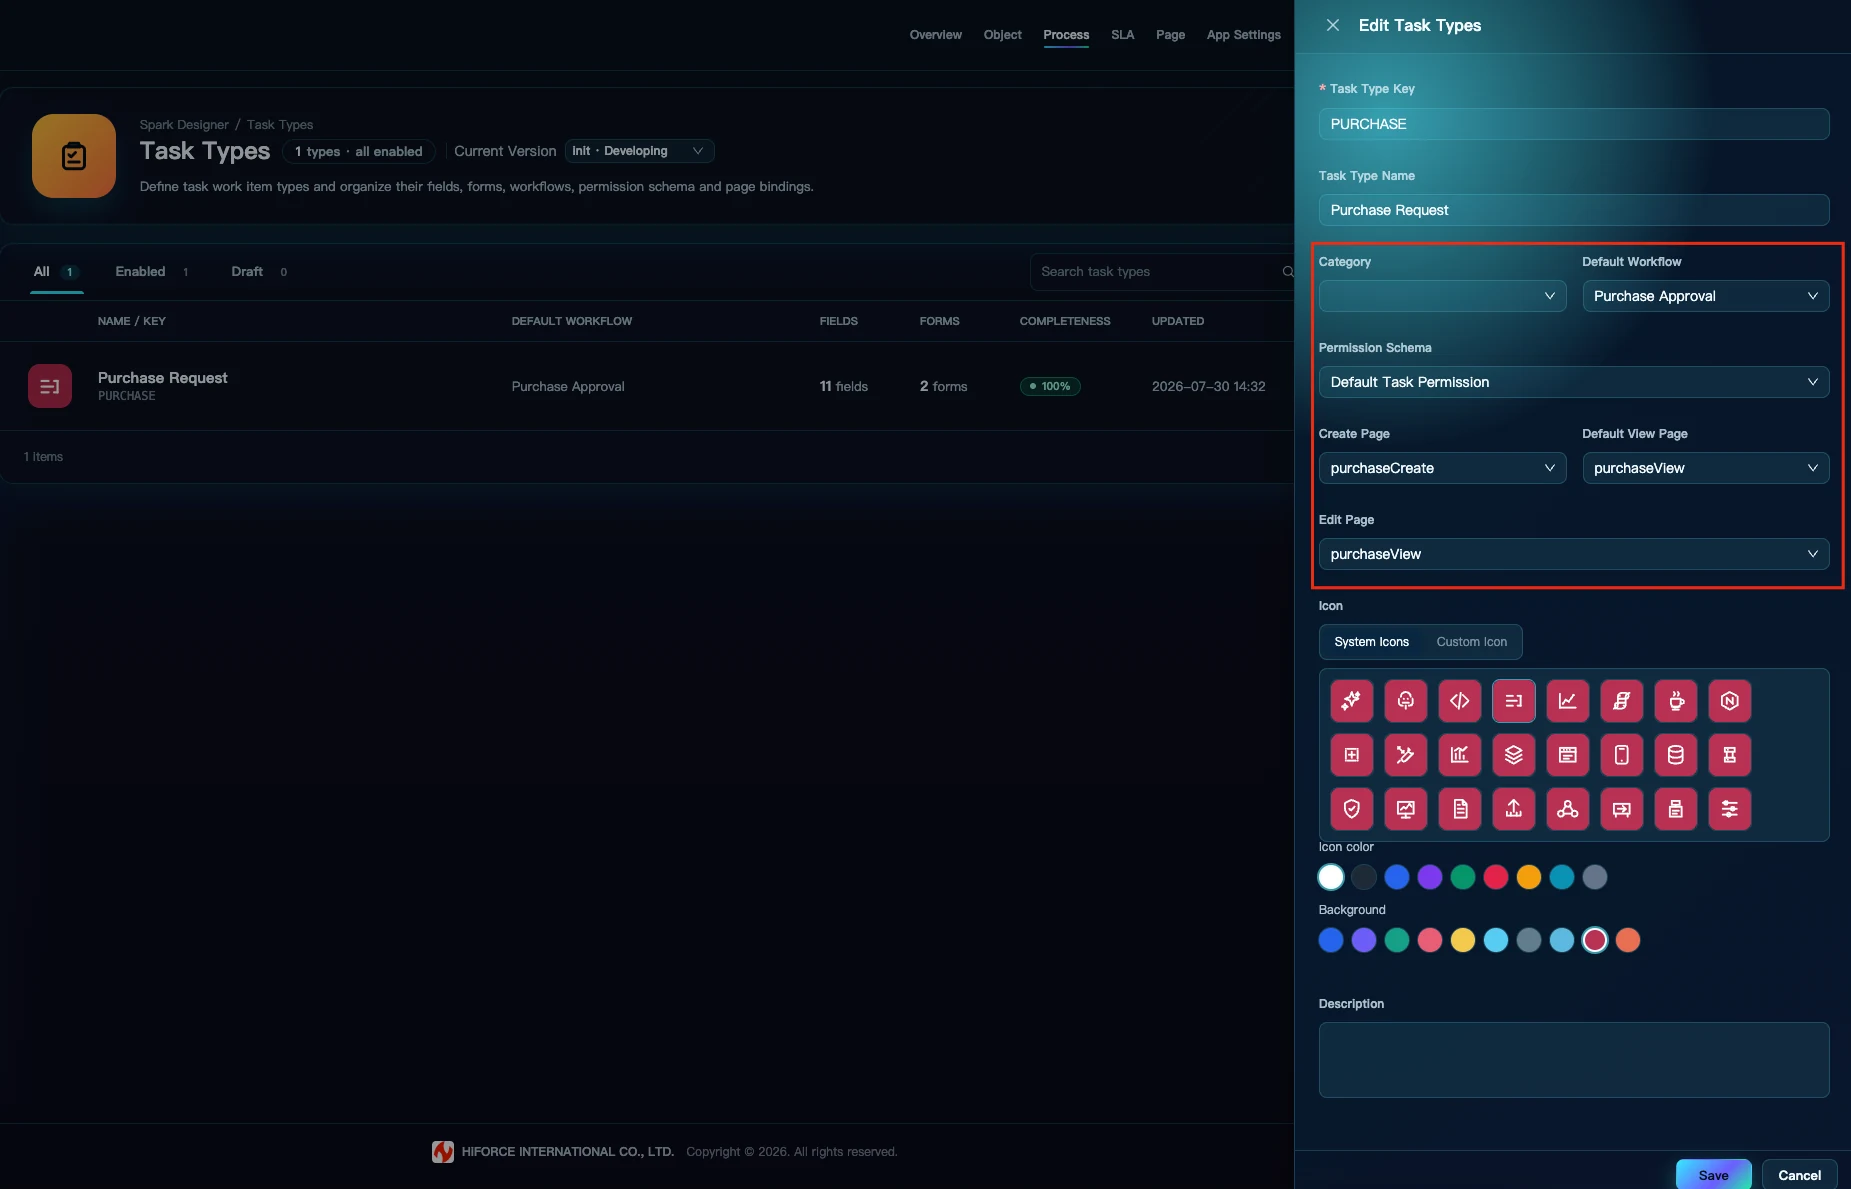
Expected result: The Task Type list shows Purchase Request, the completeness check passes, and the default workflow, permission schema, and all three form slots are bound.
7. Check the design and choose a validation environment
Return to Designer Overview, select the current DEVELOPING version, and run the readiness check. Fix blocking issues such as disconnected nodes, missing assignees, unbound assets, or incomplete permissions.
After the structural check, choose the validation environment for the current stage:
- For rapid configuration and individual debugging, open the DEV runtime directly and validate the current DEVELOPING version. This quick start follows that path, and the screenshots below are all from DEV.
- For team integration, formal acceptance, or pre-release validation, review the asset differences between the current version and the version published to TEST, then publish to TEST after confirmation. Publishing to TEST is optional and is not a prerequisite for completing this quick start.
A readiness check finds only structural problems. It does not replace validation with real organization data, roles, permissions, and runtime records. When using TEST, see Testing and Publishing for publishing details.
8. Validate in DEV
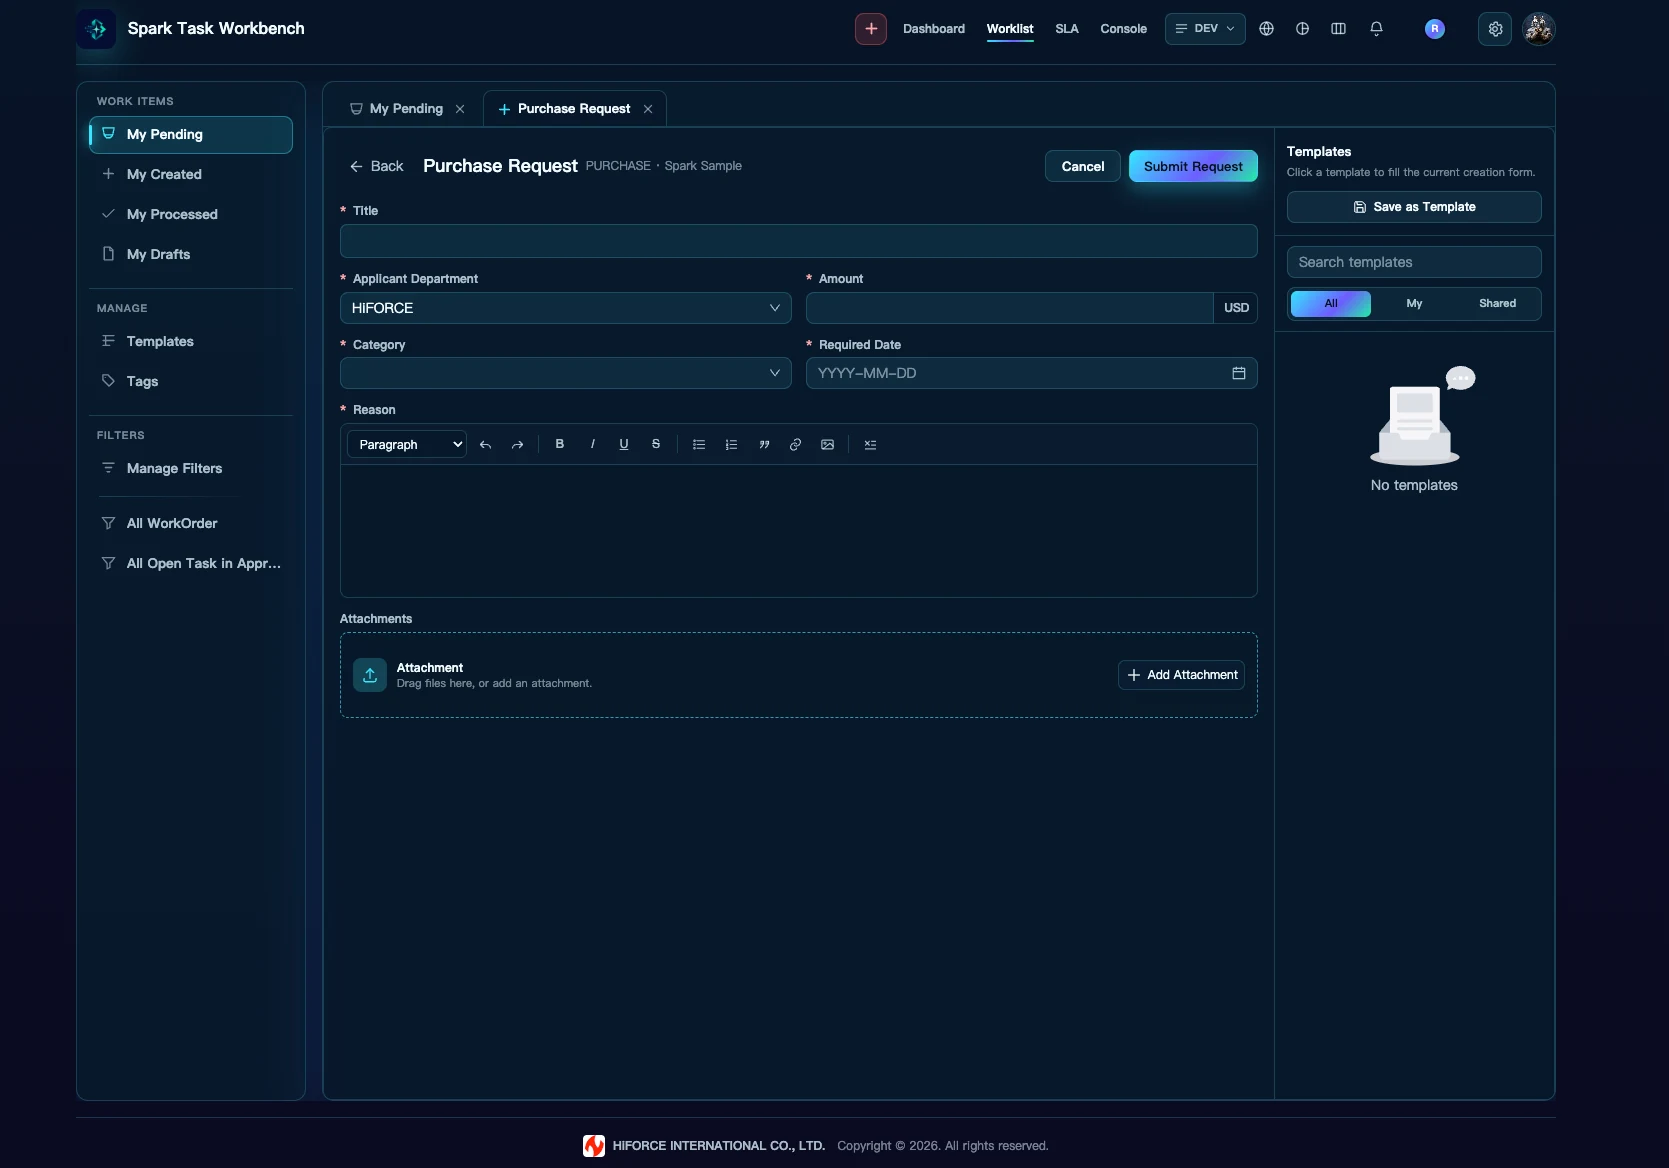
The screenshot in this section is from DEV. Run these scenarios with prepared test users:
- As Applicant, create a procurement request with Amount below 10000. After Department Manager approves it, the task should go directly to Approved.
- As Applicant, create a request with Amount at or above 10000. After department approval, it should enter Finance Review; after Finance Approver approves it, it should enter Approved.
- Create another task and select Reject at either the department or finance stage. Confirm that it enters Rejected.
- As Applicant, Department Manager, and Finance Approver, check My Created, My Pending, and processed tasks. Confirm that only the intended users can view and process each task.
- Open
purchaseView. After each Approve or Reject action, confirm that the corresponding Review Result showsApprovedorRejectedand that the review comment contains the assignee's input.
Completion criteria: Tasks can be created in DEV, assignees resolve correctly, both amount branches and the rejection branch work as expected, and forms, permissions, and review results can be verified. If you publish to TEST, repeat the same scenarios in TEST and verify the publication record.